Gatsby on Github Pages

In my first blog post 'My new Gatsby Blog with Quality built-in' I explained how I've set up my new blog with Gatsby. After I finished the setup, the next question arose: Where shall I host it?
Shall I order a new web space or even set up an own web server? ... no, too much effort! I want to focus on writing - not on maintainance!
I've already had the idea to open-source my blog and obviously the best platform to share code open-source is Github. So why not trying out Github Pages which a platform to host static content from a Github repository.
Create a Github repo
To deploy my already existing Gatsby setup to Github Pages, first, I had to create a new repository in my Github account. Simply, click on the + icon in the top right and press New repository.

It is mandatory that the repository name starts with your Github username - in my case: mroeckl.github.io

I usually use master instead of main as the default branch which can be configured in the Settings of a repository.

Push source code to Github
Then, I configured my local Gatsby repository to use my new Github repository as origin and pushed my master branch to the Github origin.
git remote add origin https://github.com/mroeckl/mroeckl.github.io.gitgit branch --set-upstream-to=origin/master mastergit push origin masterNow all the source code is stored in the new repository on Github.
Build Gatsby with Github Actions
As a next step we have to build the source code. Building is pretty convenient on Github with Github Actions. Let's click on Actions and New workflow to create a new build and deployment workflow.

Thanks to Github, packaging a Gatsby site is super easy. There is already a fully fledged workflow for building and deploying Gatsby ready to be used by us. Seach for 'Gatsby' and you will find the following workflow:

By pressing Configure the workflow file, which will be stores later under .github/workflows/ in your repository, gets visible.
Besides the actual build and deployment configuration the on field in the beginning of the file defines the triggers on which the workflow will run later on.
By default, it is triggered on every commit on master or manually.
For Continuous Delivery this is exactly what we need.
Every commit on master gets built, tested and deployed fully automatically.
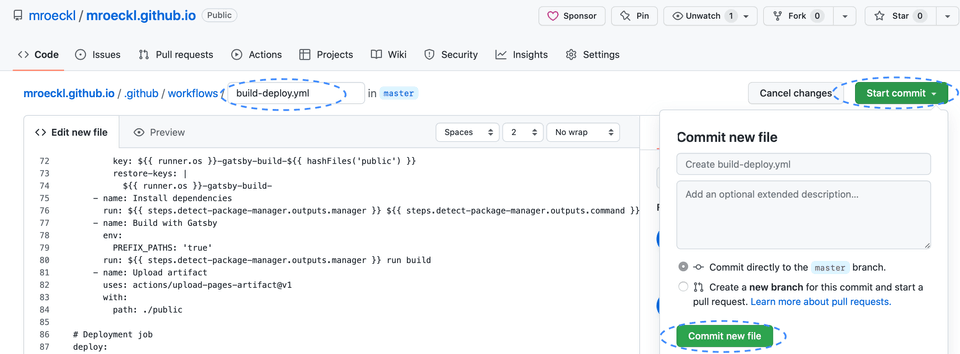
Let's give the file a nicer name like build-deploy.yml, commit it to the repository by pressing first 'Start Commit' and then 'Commit new file' on the right and you are done.

After the commit our new workflow automatically starts to run and our Gatsby site gets built and deployed.

Afterwards we can already access it under mroeckl.github.io. If you like to have a custom domain name, a simple and cheap domain service is provided by Porkbun which I used in my setup.
Connect domain to Github
After registering a domain at Porkbun, simply press on Details on the right side of your domain in the Domain Management administration frontend. Click on Edit next to the DNS RECORDS to create a new subdomain.

In the popup, you will find a section for Quick DNS Config. Select GitHub and confirm the popup.

In the Host text box you can set your preferred subdomain name for your blog. In the Answer text box replace USERNAME by your Github username.

Set your custom domain in Github
Finally, we have to tell Github that our page shall be accessible via the newly generated domain name. Go to Settings in your Github repository and select Pages in the menu on the left.

Scroll down to the section Custom domain, enter your fully qualified domain name in the text box and press Save.

After some minutes your Gatsby site is accessible via the new domain name.
You should also enforce HTTPS. Thus, select the checkbox Enforce HTTPS.
Awesome, my Gatsby site is live, accessible via Github Pages through my custom domain and every commit on the master branch gets automatically built, tested and deployed. Hurray!
Links
Photos
- Photo by Aaron Burden on Unsplash